Audi Q7 Owners & Service Manuals

Audi Q7: Roof Grab Handle, Removing and Installing

Audi Q7 (4M) 2016-2024 Workshop Manual / Body / Body  Interior / Interior Equipment / Roof Grab Handle, Removing and Installing

Special tools and workshop equipment required

  • Angled Screwdriver -VAS6543-

Removing

  Caution

Unclip the expanding caps -2 and 3- but only up to their lock position (do not pull them out all the way otherwise the silicone brake and spring and fall out and then the handle has to be replaced).

- Place the angled screwdriver -4- in the gap behind the clips -2-.

- Pivot the angled screwdriver in direction of -arrow-, until the clips slides audibly into the rest position.

- Repeat the procedure on the two clips -3-.

- Remove the roof grab handle -1- from the body opening.

- Leave the expanding caps in the rest position in the roof grab handle.

A68-10645

Installing

Install in reverse order of removal and note the following:

- Insert the grab handle in the body cut-out.

  • No clips should be between the handle and the roof trim.

- Push in the clips.

Installation notes, for example tightening specifications, replacing components. Refer to → Chapter "Overview - Sun Visors".

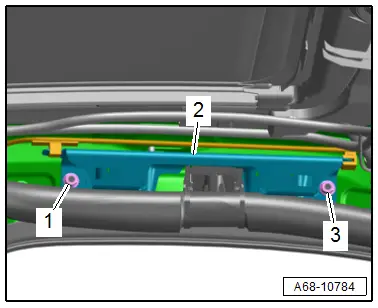
Roof Grab Handle Bracket, Removing and Installing

Removing

- Remove the headliner and lay it on the seats. It is not necessary to remove it from the vehicle. Refer to → Chapter "Headliner, Removing and Installing".

- Remove the nuts -1 and 3-.

- Remove the roof grab handle -2-.

A68-10784

Installing

Install in reverse order of removal.

Installation notes, for example tightening specifications, replacing components. Refer to → Chapter "Overview - Sun Visors".

    READ NEXT:

     Luggage Compartment Roll Cover, Removing and Installing

    Luggage Compartment Roll Cover Handle, Removing and Installing Removing - Remove the luggage compartment roll cover. - Open the lid -1- and remove the bolts -2-. - Loosen the roll cove

     Overview - Center Console

    Overview - Center Console 1 - Center Console Support Removing and Installing. Refer to → Chapter "Center Console Support, Removing and Installing". 2 - Center Console

     Center Console Rear Trim, Removing and Installing

    Special tools and workshop equipment required Wedge Set -T10383- Removing - Move the front seats all the way forward. - Unclip the cover -1- using the -T10383/1--arrows- and remove it.

    SEE MORE:

     Options and settings

    Options Requirement: the playback view (1) fig. 150 must be displayed. Press More (19), or Requirement: a list with radio stations or podcasts* must be displayed  fig. 154. Press and hold an entry in the list until the Options menu appears. Depending on the selected source and vehicle eq

     Battery

    Overview - Battery 1 - Grommet For the central venting system hose 2 - Central Venting System Hose 3 - Nut 20 Nm 4 - Ground Wire With Battery Monitoring Control Module -J367- Disconnecting and connecting. Refer to → Chapter "Battery, Disconn

    © 2019-2024 Copyright www.a-q7.com