Audi Q7: Front Brake Caliper
Overview - Front Brake Caliper
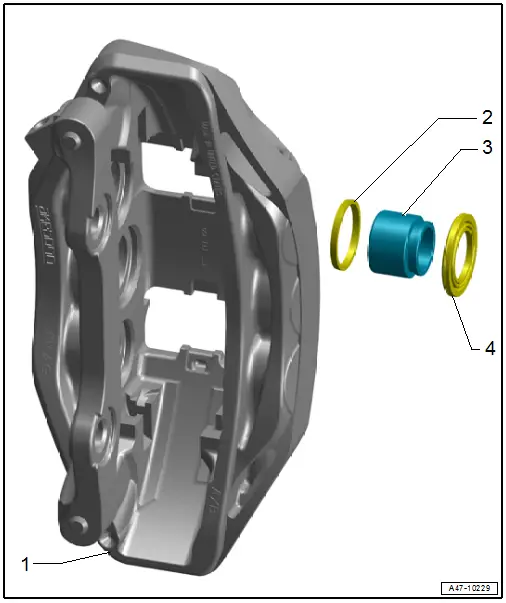
1 - Brake Caliper
2 - Gasket
- Cannot be replaced separately at this time
3 - Brake Caliper Piston
4 - Protective Cap
- Quantity: 6
- Refer to → Chapter "Dust Cap, Removing and Installing"
- Pull onto the brake caliper piston with the outer sealing lip
Dust Cap, Removing and Installing
Special tools and workshop equipment required
- Piston Resetting Tool -T10145-
Removing
- Brake caliper removed and separated from the hydraulic system. Refer to → Chapter "Brake Caliper, Replacing".
- Tension the brake caliper in a vise with protective covers over the jaws.
 WARNING
Risk of injury!
- Wear protective eyewear.
- When removing the brake caliper piston, never touch the brake caliper chamber with fingers.
- Place a rag over the brake caliper chamber, to catch any brake fluid leaking out. Place an additional rag tightly around the compressed air gun nozzle on the brake caliper.
- To prevent skin contact with brake fluid, wear chemical resistant safety gloves.
 Note
Note
- When removing the brake caliper pistons and the protective cover pay attention that, the coating on the brake caliper is not damaged.
- Only one brake caliper piston can be pressed out at a time.
- Hold the opposing brake caliper piston in the brake caliper using the Piston Resetting Tool -T10145--a-.
- To prevent damage to the brake caliper paint coating, place a piece of rubber between the Piston Resetting Tool -T10145- and the brake caliper.
- Block the other brake caliper pistons, for example, using wooden blocks -b-. In addition, place a wooden board -c- in front of the Piston Resetting Tool -T10145- so that the brake caliper piston will not be damaged when pressed out.
- Position the compressed air gun nozzle on the bore hole for the brake hose and press the brake caliper piston out of the brake caliper.

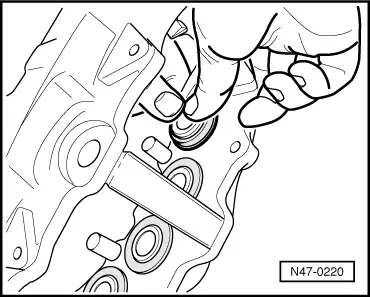
- Carefully remove the protective cap -1- with a screwdriver -2- with light hammer strokes in direction of -arrow- from the brake caliper, while doing this do not damage the brake caliper coating.
Installing
 Note
Note
- Install the entire repair kit.
- To clean the brakes only use mineral spirits.
- When a brake caliper piston or a piston cylinder are damaged, the brake caliper must be replaced.
- Clean the surface of the brake caliper piston only with mineral spirits and let it dry.
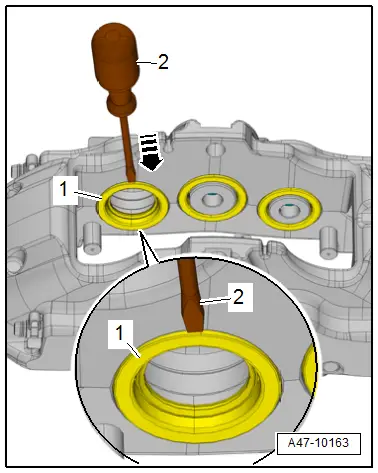
- Install the protective cap on the brake caliper piston.

- Without tilting it, push the break caliper pistons using constant pressure.
- Press the protective cap into the groove on the brake caliper.
- The protective cap must fit tightly in the groove. If necessary, push down on it slightly with the Piston Resetting Tool -T10145-.
- Repeat the work procedure on the next brake caliper piston.