Audi Q7: Moldings, Trims, Extensions and Trim Panels
Overview - Trim Molding and Covers
Overview - Trim Molding
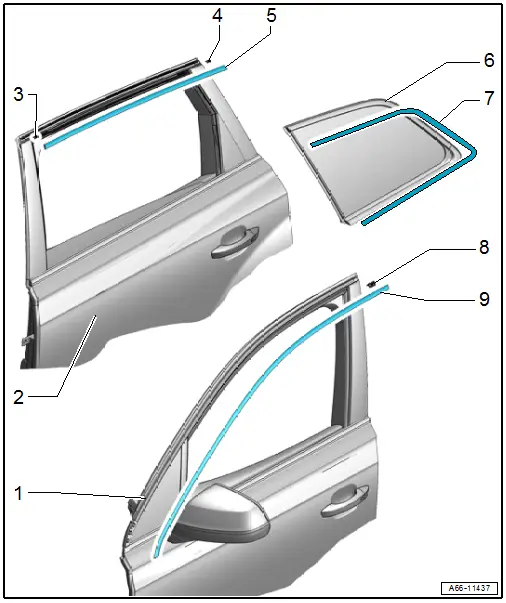
1 - Front Door
2 - Rear Door
3 - Clip
- With "front door" label
4 - Clip
- With "rear door" label
5 - Rear Door Trim Molding
- Removing and Installing. Refer to → Chapter "Trim Molding, Removing and Installing, Rear Door".
6 - Side Window
7 - Side Window Trim Molding
- Removing and Installing. Refer to → Chapter "Trim Molding, Removing and Installing, Side Window ".
8 - Clip
- With "rear door" label
9 - Front Door Trim Molding
- Removing and Installing. Refer to → Chapter "Trim Molding, Removing and Installing, Front Door".
Overview - Door Covers
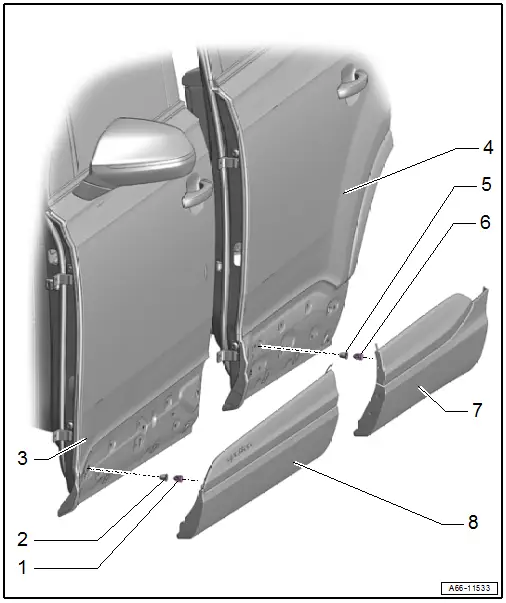
1 - Clip
- Quantity: 8
2 - Grommet
- For the clip
3 - Front Door
4 - Rear Door
5 - Grommet
- For the clip
6 - Clip
- Quantity: 7
7 - Rear Door Cover
- An unpainted door cover must be replaced after removal
- A painted door cover is to be reused after removal
- Removing and Installing. Refer to → Chapter "Door Cover, Removing and Installing, Rear".
8 - Front Door Cover
- An unpainted door cover must be replaced after removal
- A painted door cover is to be reused after removal
- Removing and Installing. Refer to → Chapter "Door Cover, Removing and Installing, Front".
Overview - Sill Panel Trim
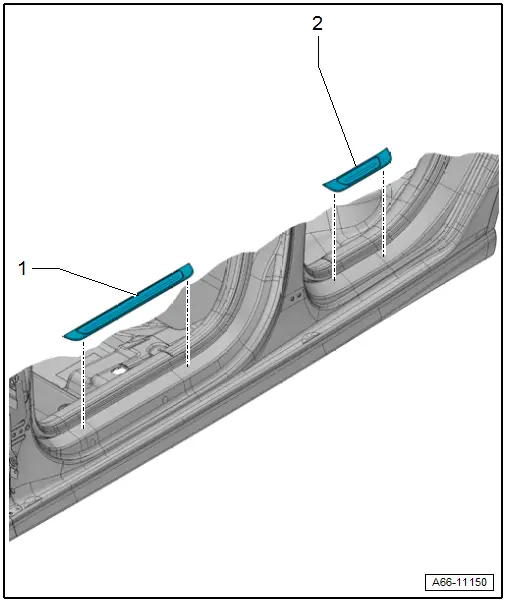
1 - Front Sill Panel Trim
- There are different versions. Refer to the Parts Catalog.
- Sill panel trim without illumination must be replaced after removal
- Sill panel trim with illumination is to be reused after removal
- Removing and Installing. Refer to → Chapter "Sill Panel Trim, Removing and Installing".
2 - Rear Sill Panel Trim
- There are different versions. Refer to the Parts Catalog.
- Sill panel trim without illumination must be replaced after removal
- Sill panel trim with illumination is to be reused after removal
- Removing and Installing. Refer to → Chapter "Sill Panel Trim, Removing and Installing".
Overview - Drip Rail

1 - Pop Rivet
- Quantity: 5
- There must not be any burrs on the rivet head when riveting
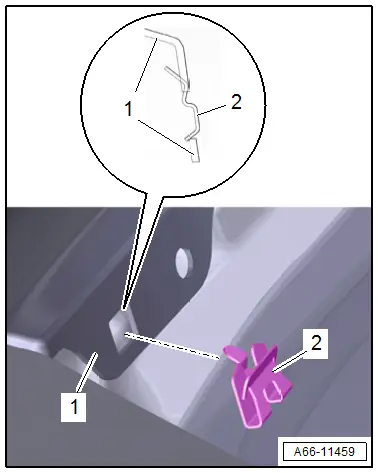
2 - Clip
- Installation position. Refer to → Fig.
3 - Drip Rail
- Removing and Installing. Refer to → Chapter "Drip Rail, Removing and Installing".
4 - Retaining Strip
- Begin riveting on the uppermost hole
Clip Installation Position
- Engage the clip -2- at the fender -1-.
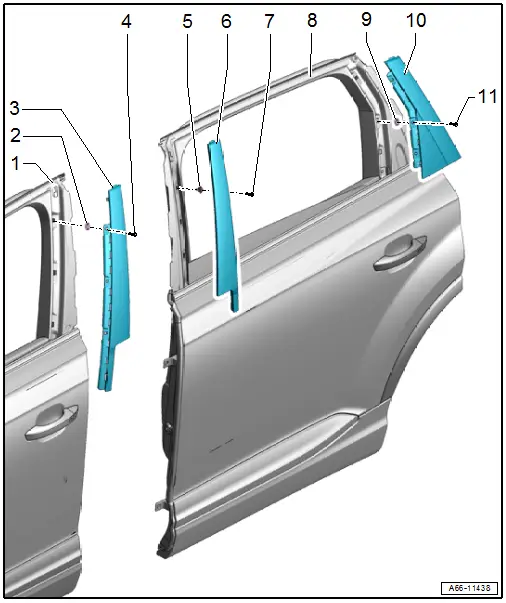
Overview - B-Pillar Trim

1 - Front Door
2 - Clip Nut
- Quantity: 3
3 - Front Door B-Pillar Trim
- Removing and Installing. Refer to → Chapter "B-Pillar Door Trim, Removing and Installing, Front ".
4 - Bolt
- 2.5 Nm
- Quantity: 3
5 - Clip Nut
- Quantity: 3
6 - Rear Door B-Pillar Trim
- Removing and Installing. Refer to → Chapter "B-Pillar Door Trim, Removing and Installing, Rear ".
7 - Bolt
- 2.5 Nm
- Quantity: 3
8 - Rear Door
9 - Clip Nut
- Overview. Refer to → Chapter "Overview - C-Pillar Trim".
10 - Door C-Pillar Trim
- Overview. Refer to → Chapter "Overview - C-Pillar Trim".
11 - Bolt
- Overview. Refer to → Chapter "Overview - C-Pillar Trim".
Overview - C-Pillar Trim
1 - Front Door
2 - Clip Nut
- Overview. Refer to → Chapter "Overview - B-Pillar Trim".
3 - Front Door B-Pillar Trim
- Overview. Refer to → Chapter "Overview - B-Pillar Trim".
4 - Bolt
- Overview. Refer to → Chapter "Overview - B-Pillar Trim".
5 - Clip Nut
- Overview. Refer to → Chapter "Overview - B-Pillar Trim".
6 - Rear Door B-Pillar Trim
- Overview. Refer to → Chapter "Overview - B-Pillar Trim".
7 - Bolt
- Overview. Refer to → Chapter "Overview - B-Pillar Trim".
8 - Rear Door
9 - Clip Nut
- Quantity: 3
10 - Door C-Pillar Trim
- Removing and Installing. Refer to → Chapter "Door C-Pillar Trim, Removing and Installing".
11 - Bolt
- 2.5 Nm
- Quantity: 3
Overview - Wheel Covers
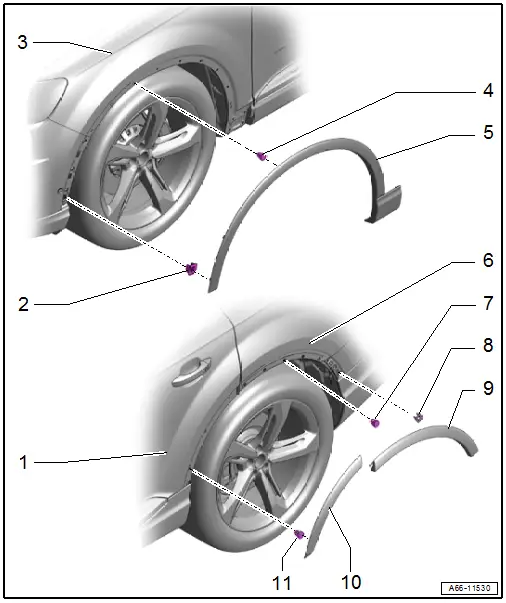
1 - Rear Door
2 - Clip
- Quantity: 3
3 - Fender
4 - Clip
- Quantity: 13
5 - Front Wheel Cover
- After removing, the grommet must be replaced
- Removing and Installing. Refer to → Chapter "Wheel Cover, Removing and Installing, Front ".
6 - Side Panel
7 - Grommet
- For the clip
- Replace the wheel cover after removal
8 - Clip
- Quantity: 2
9 - Rear Wheel Cover
- An unpainted wheel cover must be replaced after removal
- A painted wheel cover is to be reused after removal
- After removing, the grommet must be replaced
- Removing and Installing. Refer to → Chapter "Wheel Cover, Removing and Installing, Rear ".
10 - Door Wheel Cover
- An unpainted wheel cover must be replaced after removal
- A painted wheel cover is to be reused after removal
- Removing and Installing. Refer to → Chapter "Wheel Cover, Removing and Installing, Door".
11 - Grommet
- For the clip
- Replace the wheel cover after removal
Overview - Heat Shield
Overview - Front Heat Shield
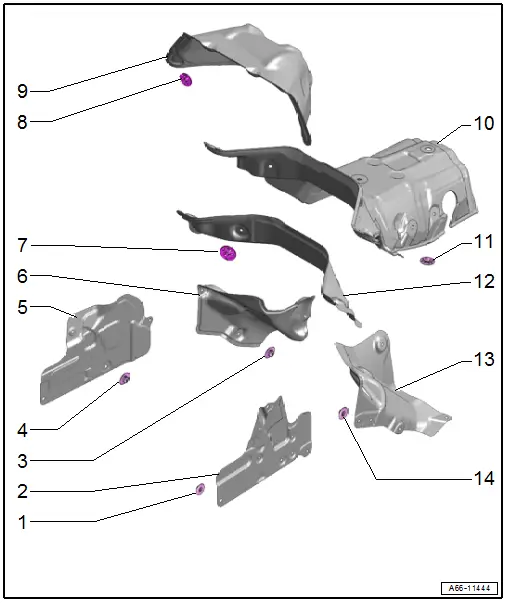
1 - Nut
- 2.5 Nm
- Quantity: 2
2 - Left Heat Shield
- For the front longitudinal member
- Removing and Installing. Refer to → Chapter "Front Longitudinal Member Heat Shield, Removing and Installing, Vehicles without High-Voltage System".
3 - Nut
- 2.5 Nm
- There are different versions. Allocation. Refer to the Parts Catalog.
- Quantity: 4
4 - Nut
- Quantity: 3
- 2.5 Nm
5 - Right Heat Shield
- For the front longitudinal member
- Removing and Installing. Refer to → Chapter "Front Longitudinal Member Heat Shield, Removing and Installing, Vehicles without High-Voltage System".
6 - Right Heat Shield
- For the rear longitudinal member
- Removing and Installing. Refer to → Chapter "Rear Longitudinal Member Heat Shield, Removing and Installing".
7 - Lock Washer
- Quantity: 4
8 - Nut
- 2.5 Nm
- Quantity: 4
9 - Heat Shield
- For the plenum chamber bulkhead
- Removing and Installing. Refer to → Chapter "Plenum Chamber Bulkhead Heat Shield, Removing and Installing".
10 - Heat Shield
- For the top of the front tunnel
- Removing and Installing. Refer to → Chapter "Upper Front Tunnel Heat Shield, Removing and Installing".
11 - Nut
- 2.5 Nm
- Quantity: 4
12 - Heat Shield
- For the lower plenum chamber bulkhead
- Removing and Installing. Refer to → Chapter "Lower Plenum Chamber Bulkhead Heat Shield, Removing and Installing".
13 - Left Heat Shield
- For the rear longitudinal member
- Removing and Installing. Refer to → Chapter "Rear Longitudinal Member Heat Shield, Removing and Installing".
14 - Nut
- 2.5 Nm
- There are different versions. Allocation. Refer to the Parts Catalog.
- Quantity: 4
Overview - Rear Heat Shield
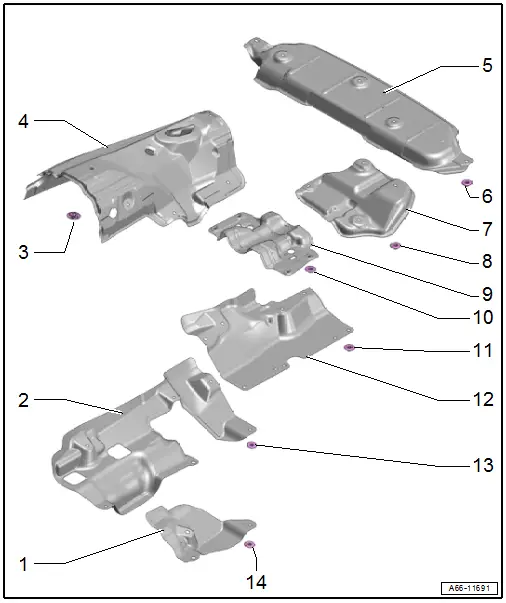
1 - Heat Shield
- Market-Specific Version
- For the front tunnel brace
- Removing and Installing. Refer to → Chapter "Heat Shield for Front Tunnel Brace, Removing and Installing".
2 - Heat Shield
- For the front of the tunnel
- Removing and Installing. Refer to → Chapter "Heat Shield for Front Tunnel, Removing and Installing".
3 - Nut
- 2.5 Nm
4 - Heat Shield
- For the transmission tunnel
- Removing and Installing. Refer to → Chapter "Transmission Tunnel Heat Shield, Removing and Installing".
5 - Heat Shield
- For the rear muffler
- Removing and Installing. Refer to → Chapter "Rear Muffler Heat Shield, Removing and Installing".
6 - Nut
- 2.5 Nm
- Quantity: 5
7 - Heat Shield
- For the center of the exhaust system
- Removing and Installing. Refer to → Chapter "Center Exhaust System Heat Shield, Removing and Installing".
8 - Nut
- 2.5 Nm
- Quantity: 4
9 - Heat Shield
- For the driveshaft
- Removing and Installing. Refer to → Chapter "Driveshaft Heat Shield, Removing and Installing".
10 - Nut
- 2.5 Nm
- Quantity: 4
11 - Nut
- 2.5 Nm
12 - Heat Shield
- For the tunnel rear
- Removing and Installing. Refer to → Chapter "Heat Shield for Rear Tunnel, Removing and Installing".
13 - Nut
- 2.5 Nm
- Quantity: 2
14 - Nut/bolt
- 2.5 Nm

