Audi Q7: Seat Position Sensor
Overview - Seat Position Sensor
 Note
Note
The seat position sensor with the wiring harness for the front passenger seat is shown in the image.
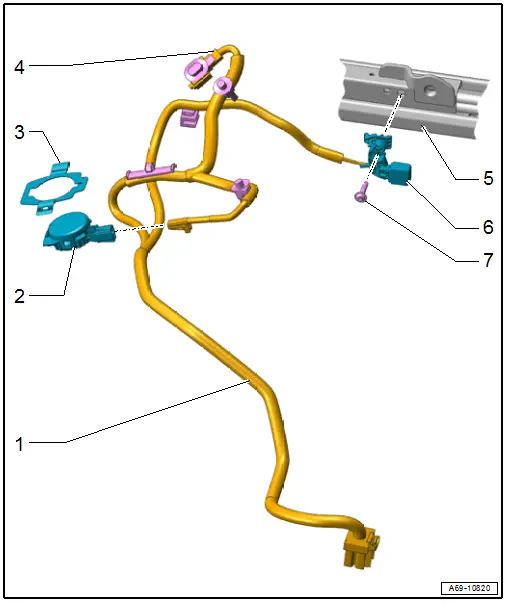
1 - Wiring Harness
- Clipped in the seat frame.
- Connector station in the vehicle floor under on the seat.
- Removing and installing. Refer to → Chapter "Seat Position Sensor, Removing and Installing".
2 - Front Passenger Occupant Detection Sensor -G128-
- Only the front passenger side
- Removing and installing. Refer to → Chapter "Front Passenger Occupant Detection Sensor -G128-, Removing and Installing".
3 - Passenger Occupant Detection Sensor Bracket
- Clipped in the seat frame.
- Removing and installing. Refer to → Chapter "Front Passenger Occupant Detection Sensor -G128-, Removing and Installing".
4 - Connector Coupling
- For the seat belt latch
5 - Seat Rail
- Tunnel-side
6 - Front Passenger Seat Position Sensor -G554-
- Driver seat: Driver Seat Position Sensor -G553-
- Removing and installing. Refer to → Chapter "Seat Position Sensor, Removing and Installing".
7 - Screw
- 1.2 Nm
Seat Position Sensor, Removing and Installing
The seat position sensor is available as a replacement part with the wiring harness and connector. The following wires with connectors are contained in the wiring harness:
- Driver Seat Position Sensor -G553-: wire with connector for seat belt latch connection.
- Front Passenger Seat Position Sensor -G554-: wire with connector for seat belt latch connection, passenger occupant detection sensor and passenger occupant detection system control module (market-specific).
Removing
- Disconnect modular wiring routing. Refer to → Chapter "Modular Wiring Routing, Disconnecting and Connecting".
- Open the corrugated tube, remove the wire for the Driver Seat Position Sensor -G553-/ Front Passenger Seat Position Sensor -G554- with the connector and free up.
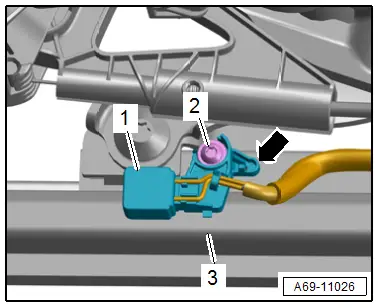
- Remove the bolt -2-.
- Unclip and disengage the seat position sensor -1- for the seat pan lower frame -3--arrow-.
- Remove the cable ties or cable clips for the wire on the seat pan lower frame.
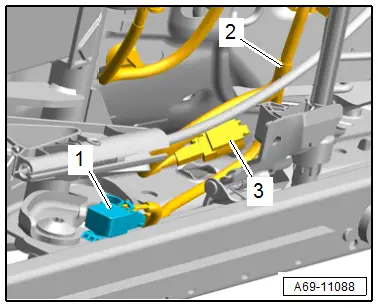
Driver Seat
- Free up the connector -3- for the seat belt latch and disconnect.
- Remove the seat position sensor -1- with the wire -2-.
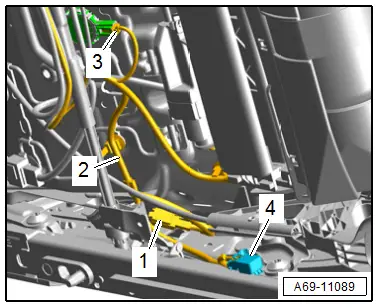
Front Passenger Seat
- Free up the connector -1- for the seat belt latch and disconnect.
- Disconnect the connector -3- on the Front Passenger Occupant Detection Sensor -G128-.
- Remove the seat position sensor -4- with the wire -2-.
Installing
Install in reverse order of removal.
Installation notes, for example tightening specifications, replacing components. Refer to → Chapter "Overview - Seat Position Sensor".

