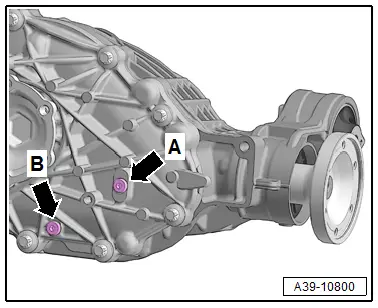
Audi Q7: Component Location Overview - Drain and Check Plugs
Component Location Overview - Drain and Check Plugs, 0BD, 0D2
-Arrow A- Fill and Check Plugs
for Gear Oil
- Tightening specification: 15 Nm
-Arrow B- Gear Oil Drain Plug
- Tightening specification: 15 Nm
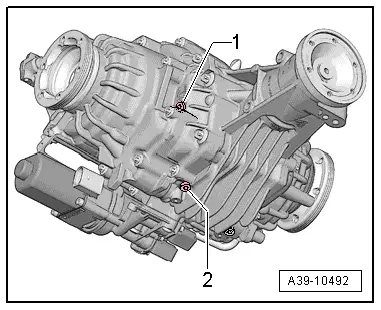
Component Location Overview - Drain and Check Plugs, 0D3 "Sport
Differential"
Gear Oil Drain Plugs on Rear Final Drive 0D3
1- Check plug for gear oil
- Tightening specification: 15 Nm
- Always replace.
2- Gear oil drain plug
- Tightening specification: 15 Nm
- Always replace.
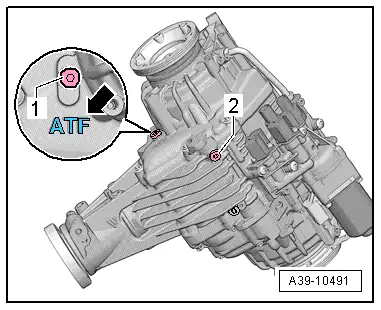
ATF Drain Plugs on Rear Final Drive 0D3
1- ATF check plug
- Identification "ATF" on the
housing -arrow-
- Tightening specification: 15 Nm
- Always replace.
2 - ATF drain plug
- Tightening specification: 15 Nm
- Always replace.
READ NEXT:
Gear Oil, Checking Level, 0DB and 0D2
Special tools and workshop equipment
required
Drip Tray
Caution
This procedure contains mandatory replaceable parts.
Refer to component overview pri
Gear Oil, Draining, 0D3 "Sport Differential"
Special tools and workshop equipment
required
Drip Tray
Caution
This procedure contains mandatory replaceable parts.
Refer to component overv
ATF Level, Checking
ATF Level, Checking, 0D3 "Sport Differential"
Caution
This procedure contains mandatory replaceable parts.
Refer to component overview prior to starting procedure.
Mandat
SEE MORE:
Model with Longitudinally Installed Engine
Tread variance for models with a longitudinally installed
engine, such as A4, A5, A6, A7, A8, Q5, Q7, ...
The variance between the front and rear axle in this case
may not be more then 2 mm
Note
The technical background of the limitations are ther
This information can be found in the Wheels and Tires repair manual. Refer to
→ Suspension, Wheels, Steering; Rep. Gr.44; Wheels and Tires.
Tire Pressure Monitoring System
Tire Pressure Monitoring Control Module -J502-, Removing and Installing
Removing
Component location: on the r

