Audi Q7: Seat Forward/Back Adjuster, Removing and Installing
Seat Forward/Back Adjuster, Removing and Installing, Seat Forward/Back Adjustment Handle
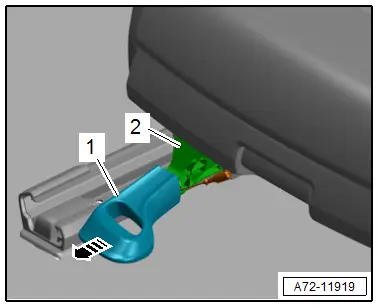
Removing
- Bring the front seat all the way to the rear and then into its highest position.
- To release the handle push a flat-head screwdriver between the handle -1- and the handle mount -2-.
- Remove the seat forward/back adjustment handle from the handle mount at the same time in the direction of -arrow-.
Installing
Install in reverse order of removal.
Installation notes, for example tightening specifications, replacing components. Refer to → Chapter "Overview - Seat Pan, Seat without Seat Depth Adjuster".
Seat Forward/Back Adjuster, Removing and Installing, Seat Forward/Back Adjuster Release Cable
Removing
 WARNING
- Follow all safety precautions when working on pyrotechnic components. Refer to → Chapter "Safety Precautions for Pyrotechnic Components".
- Before handling pyrotechnic components (for example, disconnecting the connector), the person handling it must "discharge static electricity". This can be done by briefly touching the door striker pin, for example.
- Remove the front seat. Refer to → Chapter "Front Seat, Removing and Installing".
- Fasten the front seat on the -VAS6136-. Refer to → Chapter "Front Seat, Mounting on Fixture for Seat Repair".
- Remove the cover and cushion from the seat pan in the area of the threaded connection. Refer to → Chapter "Seat Pan Cover and Cushion, Removing and Installing, Seat without Seat Depth Adjuster".
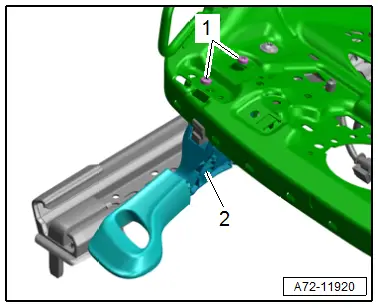
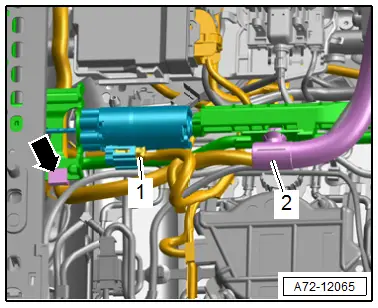
- Remove the bolts -1-.
- Remove the seat forward/back adjuster release cable -2- from the seat pan.
- Unclip the lower seat forward/back adjuster release cable from the seat pan.
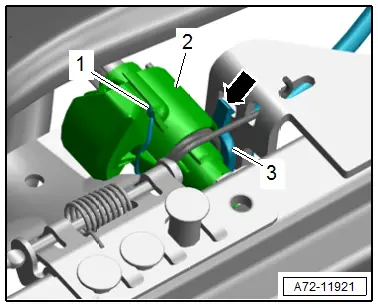
- Release the tab -arrow- to disengage the release cable support bracket -3- from the bracket on the seat pan.
- Disengage the release cable -1- from the seat forward/back adjustment release lever -2- and remove.
Installing
 WARNING
- Follow all safety precautions when working on pyrotechnic components. Refer to → Chapter "Safety Precautions for Pyrotechnic Components".
- Before handling pyrotechnic components (for example, connecting the connector), the person handling it must "discharge static electricity". This can be done by briefly touching the door striker pin, for example.
- Observe all measures when installing the front seat. Refer to → Chapter "Front Seat, Removing and Installing".
Install in reverse order of removal.
Installation notes, for example tightening specifications, replacing components. Refer to → Chapter "Overview - Seat Pan, Seat without Seat Depth Adjuster".
Lower Frame, Removing and Installing, Seat Forward/Back Adjustment Motor
Special tools and workshop equipment required
- Engine/Transmission Holder - Seat Repair Fixture -VAS6136-
 Note
Note
The Driver Seat Forward/Back Adjustment Motor -V28-/ Front Passenger Seat Forward/Back Adjustment Motor -V31- is integrated into the seat pan lower frame. The seat forward/back adjustment motor cannot be replaced separately.
Removing
 WARNING
- Follow all safety precautions when working on pyrotechnic components. Refer to → Chapter "Safety Precautions for Pyrotechnic Components".
- Before handling pyrotechnic components (for example, disconnecting the connector), the person handling it must "discharge static electricity". For example, this can be done by briefly touching the door striker.
- Move the front seat to the highest position possible to keep the torsion bar tension as low as possible.
- Remove the front seat. Refer to → Chapter "Front Seat, Removing and Installing".
- Fasten the front seat on the -VAS6136-. Refer to → Chapter "Front Seat, Mounting on Fixture for Seat Repair".
- Remove the front and rear cover for the seat rail. Refer to → Chapter "Front and Rear Seat Rail Cover, Removing and Installing".
- Remove the upper center seat rail cover. Refer to → Chapter "Upper Center Seat Rail Cover, Removing and Installing".
- Remove the lower center seat rail cover. Refer to → Chapter "Lower Center Seat Rail Cover, Removing and Installing".
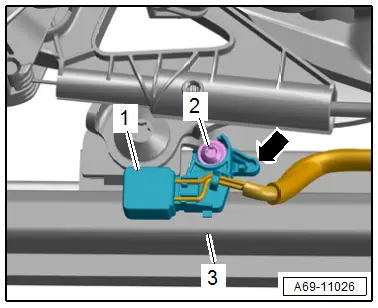
- Remove the bolt -2- and unclip the seat position sensor -1- from the seat pan lower frame -3--arrow- and disengage.
- Remove the front seat belt latch from the tunnel-side seat rail and set to the side with the wire attached.
- Unclip the rear bracket -2- for the wire routing on the seat pan with a screwdriver.
- Disconnect the connector -1- on the seat forward/back adjustment motor.
- Free up the wire -arrow-.
- Support the seat pan upper frame with the backrest. so that it does not fall or get damaged when disconnecting it from the lower frame.
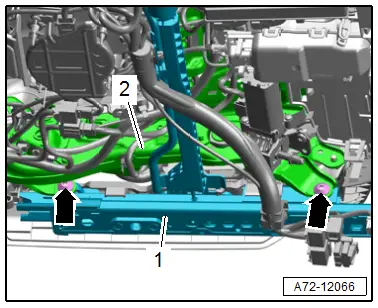
- Remove the front and rear bolts on the left and right side -arrows-.
- Remove the seat pan upper frame -2- with the backrest form the lower frame -1- and place it on a clean surface.
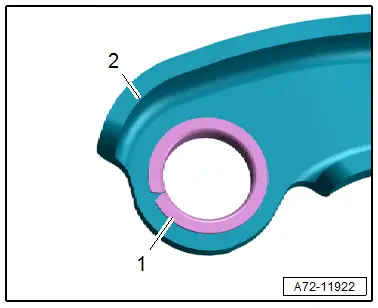
 Caution
Risk of damaging the bushings -1- in the bearing points -2- (upper/lower frame bolted connection).
- The bushings cannot be replaced with workshop materials.
- If the bushings are damaged, the corresponding parts must be replaced.
Installing
 WARNING
- Follow all safety precautions when working on pyrotechnic components. Refer to → Chapter "Safety Precautions for Pyrotechnic Components".
- Before handling pyrotechnic components (for example, connecting a connector), the person handling it must "discharge static electricity". For example, this can be done by briefly touching the door striker.
- Follow all the instructions when installing the front seat. Refer to → Chapter "Front Seat, Removing and Installing".
Install in reverse order of removal and note the following:
- If the seat pan lower frame is replaced, adjust the front seat belt latch. Refer to → Chapter "Front Seat Belt Latch, Removing and Installing".
Installation instructions: for example tightening specifications, replacing components. Refer to → Chapter "Overview - Seat Pan, Seat Forward/Back and Height Adjustment".

